Wednesday, March 26, 2008

It's a lining

With the help of my sons, who greatly enjoyed playing with the contents of the rec room closet as I dug through it, I found my long ignored sewing machine and took it for a spin. After much finagling, which I should have photo-documented so I could remember what I did, I ended up with this:
DSC_0001.JPG
Here's a better shot of the handles:
DSC_0005.JPG
The handles are quite heavy for the bag, so I may need to get something to put in the bottom to make it sturdier. All in all, I am pleased with the finished product. As for my sewing skills, let's just say it is a good thing that the wrong side of the lining is hidden.

Friday, March 21, 2008

New Work on Old Projects

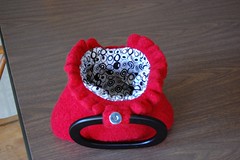
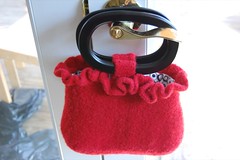
I have had a lot going on lately, so much of my knitting has been the meditative sort. This means projects that require minimal shaping and consist of stockinette or garter stitch. Though most of it is mindless, I have been sneaking in an occasional twist to keep it interesting. For example, I started yet another Sophie for the preschool auction, but decided to add a ruffle at the top as well as tabs to hold the handles.
DSC_0005.JPG
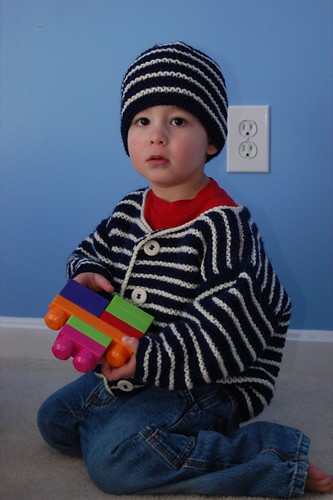
The spring cleaning bug has also struck, and while trying to reorganize my craft closet I came upon two projects which I have ignored for a while. One is a baby sweater, worked entirely in seed stitch in cream Encore Worsted.
DSC_0048.JPG
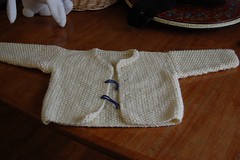
When I first seamed the sleeves, the yarn had a strange color change which made it look almost yellow in one spot.
DSC_0047.JPG
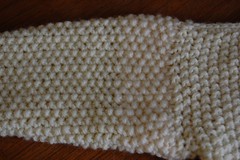
I started to rip the seam on the discolored side, and made a huge mess, so I put it away for several months. Then one day I was reading about dyeing with Kool-Aid, and thought it might be a fun solution to my yarn discoloration problem, even though the acrylic content of the yarn would prevent it from absorbing a lot of the color. So I took the sweater out and restitched the mess, and then put it away again since I didn't have the time to try dyeing it then. Now that it has made its way out again, I plan to try dyeing it, even if the color is only absorbed enough to disguise the discoloration. Wish me luck!

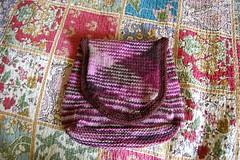
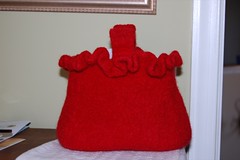
The other project is a cable purse which I knitted about a year ago from some leftover Reynolds Lopi. When I went to sew the handles on the bag, for some reason I suddenly felt allergic to the Lopi, so into the craft closet it went. When I tried again this time, I didn't have an issue.
DSC_0056.JPG
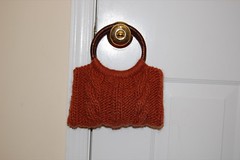
I knew that this bag would not be very useful without a lining, so I took the bag to JoAnn and found some coordinating fabric and thread.
DSC_0059.JPG
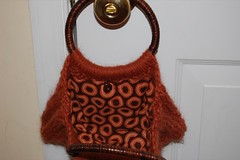
I'm sure the process would have been much easier if I had done it before attaching the handles, but considering it was my first attempt at a lining, I don't think it is horrendous, and at least the bag is usable. I also got some fabric to line the ruffled Sophie, so I am curious to see how that works out.

Monday, March 10, 2008

Felted Purse and Impromptu Scarf

I decided to make a felted purse for the silent auction at my son's preschool. The last time I made a Sophie bag I had just discovered felting, and it was a great project to get me started. Even though my skills have advanced since then, I still appreciate the brilliant simplicity and thriftiness of the pattern. I had some Patons Classic Merino in Rosewood which I have been wanting to destash, so away I went.

I knew I wasn't going to do the handles from the pattern, so when I reached the top of the bag and had a lot of yarn to spare, I decided to knit a flap. I worked it by binding off all but the back stitches, knitting straight for about 25 rows, and then binding off 2 stitches at each end until I liked the shape of the flap - probably 8 rows with the decrease in all. I learned in a past felting calamity that flaps often become skinny and wonky when felted. I decided to try and prevent this by adding an edging. Luckily I happened to have some brown Patons which miraculously matched the Rosewood. I used it to pick up stitches around the flap and worked 6 rows in garter stitch.
DSC_0010.JPG
Now I wasn't sure what to do about a handle, since it is difficult to know just how small the bag is going to get when felted. And, in my experience, Patons Merino goes from 60 to 0 in about 5 minutes. So in preparation for the unexpected, I made 3 30" long i-cords over 6 stitches.
DSC_0006.JPG
As you can see, the bag did felt down quite a bit, from 13" wide and 10 1/2" tall pre-felting to 8" wide and 5 1/2" tall post-felting, and the i-cords shrank about 10". Happily, the edging did its job on the flap, and it retained its rounded shape. I braided the 3 i-cords (they were still a little wet when I did, so hopefully they will dry thoroughly) and sewed them to the sides of the bag. I'll definitely need to do a better job of securing them, but I couldn't resist taking a few pics beforehand. I haven't decided whether or not it needs a button or snap.
DSC_0012.JPG
While the bag was felting, my 4-year-old decided that his new friend, Toa Hahli (a Happy Meal Bionicle toy that he chose from the treasure chest at school last week) needed a scarf to keep her warm. With i-cords fresh on my mind, I quickly whipped up this little number. Isn't she lovely!?
DSC_0026.JPG

Monday, March 03, 2008

One down

DSC_0004.JPG I managed to finish sock #1 today during the boys' rest time. It is rather thick, but comfy, and I could easily see the pair ending up as a favorite to wear around the house, whenever I finish the other one. I can see how knitters would be enthralled by making socks. They take a relatively small time to finish, they are a great project for travel, using luxury yarn would not break the bank and the measurements can easily be personalized, making them a special gift unlike anything you would find in a store. But before I toot the sock horn any more, lets see if I actually finish the other one.

Sunday, March 02, 2008

Dual purpose sock post

I am trying out "my blogs" in Facebook, and for some reason it is only showing a blog entry from a while ago, so I figured I would post my sock progress and see if it would show up.
DSC_0003.JPG
I have about three and a half inches to go before toe shaping. This sock is going thick enough to enable me to wear my husband's size 13 shoes!

Garter stitch ensemble preview

Here is the garter stitch cardigan with matching hat for Kate's baby boy, modeled by Abe.
DSC_0016.JPG
Garter stitch works well for growing babies and children because it makes such a stretchy garment. I hope the recipient will be able to get a lot of use out of this ensemble.

I am chugging along on my sock, while trying to convince myself that working with dpns is fun. At least I figured out, after a little ripping, that I wouldn't get ladders in my work if, when moving to the next needle, I knit the first stitch onto the previous needle, not the empty one. I am interested to see how the heel works, so there is incentive to get to the end. Who knows, maybe when this project is finished I'll join the ranks of the many sock knitting addicts.